Sony Vegas is a popular video editor for Windows 8, 7, XP, and Vista. Many people use this professional video editing software to make home videos, especial to edit camcorder videos. The latest version is Sony Vegas Pro 12, and the Pro 13 is coming soon.
As Sony Vegas provides powerful editing features, it gains great popularity from all over the world. It supports a wide range of video formats like WMV, MOV, MP4, MPG, etc. To touch up these videos with Sony Vegas is just a piece of cake. However, there is a problem, it does not support DVD movies, which means, you cannot edit DVD in Sony Vegas directly, and you will fail to import DVD to Sony Vegas. But do not worry, there is a good solution here, you can use some third-party software like DVD Ripper to rip DVD to Sony Vegas.
To convert DVD to Sony Vegas Pro, you can try iOrgsoft DVD Ripper software. It is a professional DVD ripping tool that can rip DVD (including the encrypted DVD ) to all popular video and formats such as AVI, WMV, MP4, MKV, MOV, FLV, MP3, AAC, WMA, WAV, and so on.
How to Add DVD to Sony Vegas Pro
Step 1. Load DVD to the program
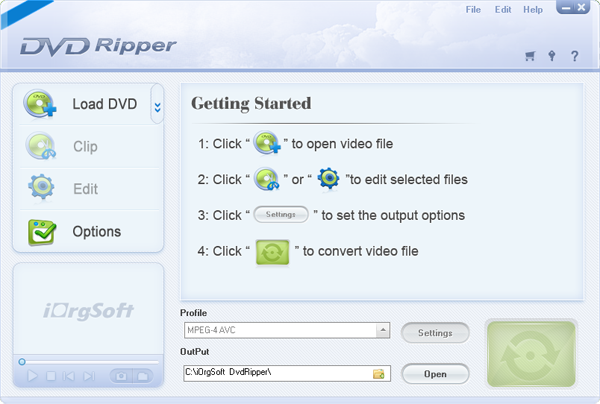
Download and install iOrgsoft DVD Ripper to your computer, run it. Hit Load DVD button to import your DVD videos to it. All chapters will be loaded to the program, on the software main interface, there is a viewing window provided for you to preview the DVD files, select the one(s) you need.
Step 2. Select output format
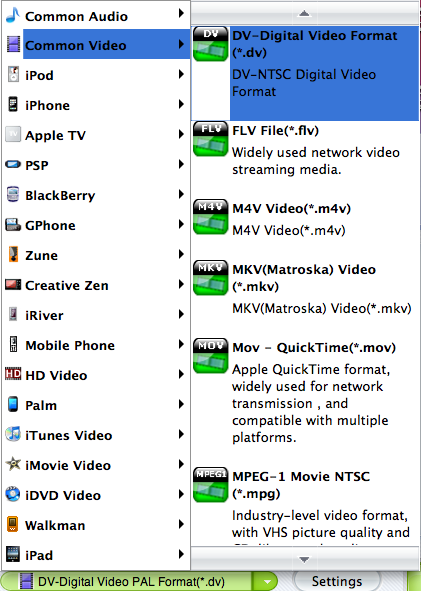
Next, click the box below Profile to open the format list, go to the Common video column to choose WMV, which is highly compatible with Sony Vegas, as output format. You can also set video and audio bit rate, encoder, etc. as you like by clicking “Settings”
Step 3. Convert DVD to Sony Vegas
After all settings are finished, click the Convert button at the bottom to rip DVD to Sony Vegas format. Just wait till the conversion over. After the conversion, you can import the converted WMV videos to Sony Vegas for editing.


